Back to Page
Amazon Storefront Design
Top Amazon Storefront Examples and How to Build a Winning Brand Store in 2024
Top Amazon Storefront Examples and How to Build a Winning Brand Store in 2024


Back to Page
Amazon Storefront Design
Top Amazon Storefront Examples and How to Build a Winning Brand Store in 2024

TL;DR
Anyone can set up an Amazon Storefront with ready-made templates, but making one stand out requires more than just dragging and dropping.
Organize your products into categories and subcategories to help customers easily find what they need.
Follow a solid layout: Start with a great header image, share your brand’s story, and then guide customers through clean, linked categories.
Use bestseller and recommended tiles, which are auto-populated by Amazon.
Always finish with a product grid of 500 ASINs per page to make sure customers have access to your top products.
Once built, submit your storefront for review. Amazon will approve it within 24 hours, making it live for your customers.
Anyone can throw together an Amazon Storefront. Amazon gives you some ready-made templates, and all you have to do is plug in your lifestyle shots, infographics, and product listings. Boom—your storefront is live.
But if you want a storefront that’s rated high by Amazon (yep, Amazon grades them), you’ve got to know a little more than just dragging and dropping. There’s a method to the madness, and in this blog post, we’re diving deep into what makes an Amazon brand store design stand out. Keep reading!
Quick guide
Step 1: Divide products into categories and subcategories
Step 2: Complete the initial store setup
Step 3: Create a store layout
Make a great first impression with a header image
Give them a reason to stay
Show them what you sell
Add the “Bestsellers” and “Recommended for you” tiles
Add more banners (show more, tell less)
Add a product grid
Step 4: Start adding your assets to your Amazon brand page design
Step 5: Submit and optimize
Amazon storefront FAQs
Q1: What are the eligibility criteria for creating an Amazon Storefront?
Q2: How to Add a New Page / Sub-Pages to an Amazon Storefront
Q3: How to measure the performance of an Amazon Storefront
Q4: Types of tiles in Amazon Storefront
Q5: Common rejection reasons for Amazon Storefront
Q6: Does Amazon Storefront impact SEO?
Top Amazon storefront designs created by eStore Factory
Step 1: Divide products into categories and subcategories
There are two scenarios to consider. Scenario 1: you have dozens or even hundreds of products. Scenario 2: you have only 10, 5, or even fewer products. If you have more products, creating categories and subcategories becomes essential for organizing and simplifying navigation for your customers.
This is especially helpful when shoppers are trying to find specific products. For example, if you’re selling outdoor gear, you might have a main category for "Camping Equipment" and subcategories for "Tents," "Sleeping Bags," and "Backpacks." This structure helps guide customers quickly to what they’re looking for.
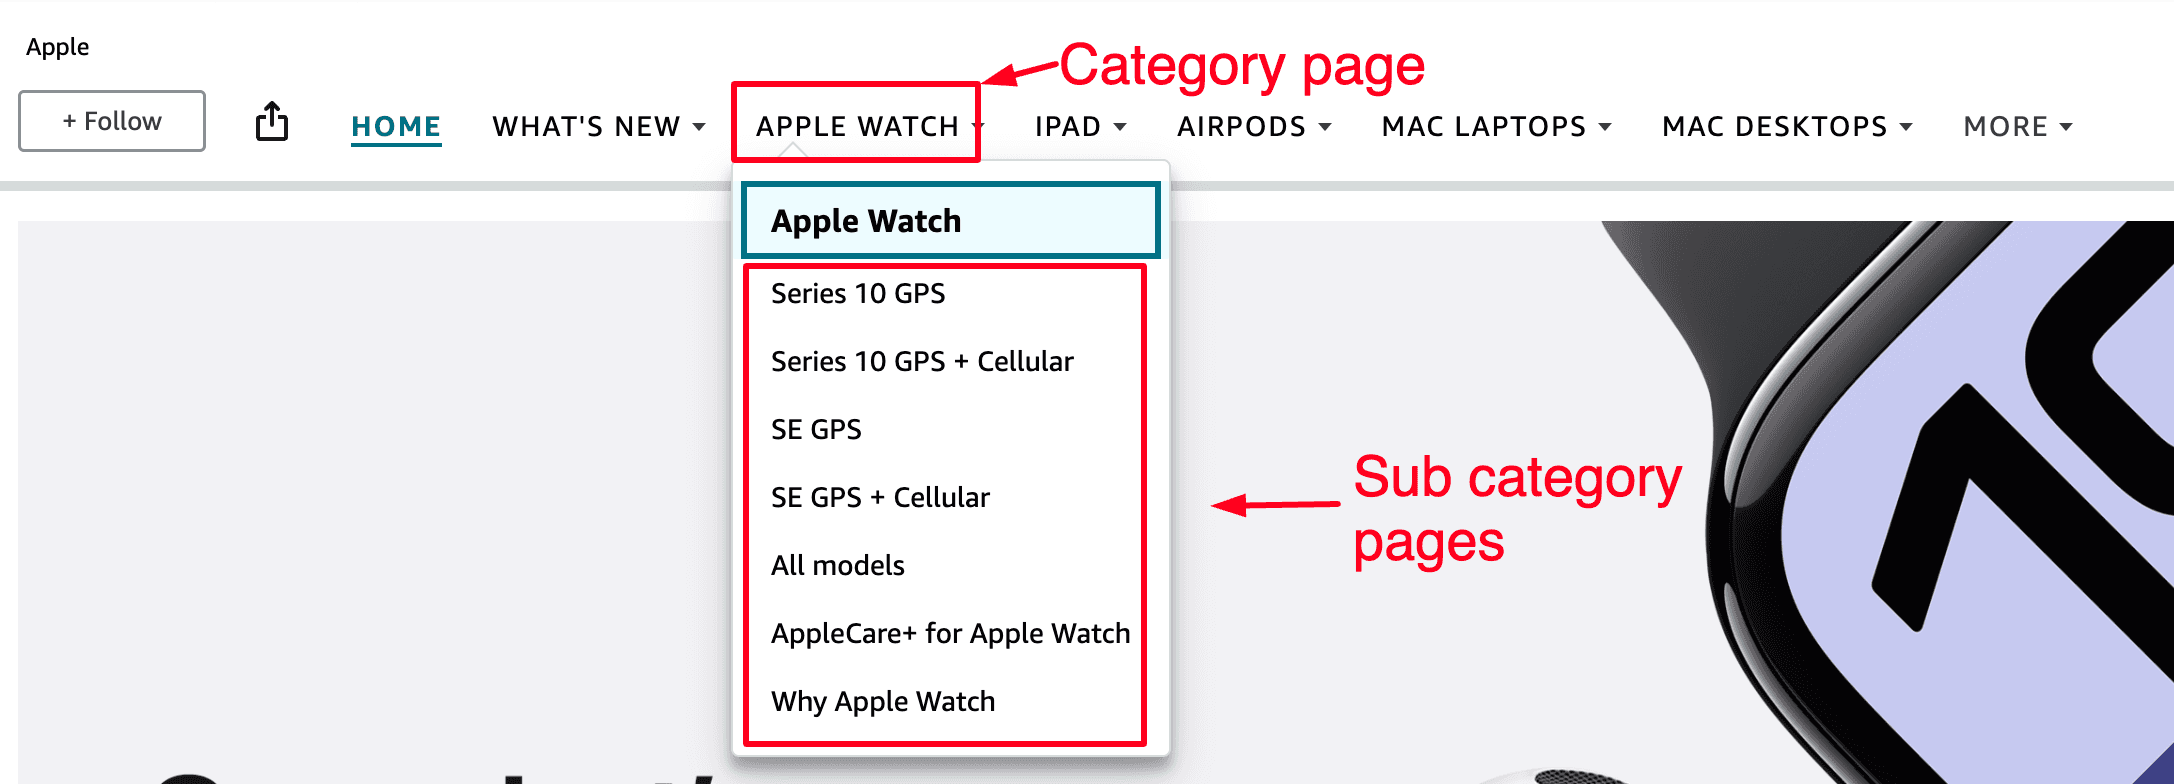
To get started with setting up your categories and subcategories, the first step is to create a list of ASINs. Once you have that list, go through the ASINs and group them into practical categories that make sense for your product range. For example, if you’re selling beauty products, you could divide them into "Skincare," "Makeup," and "Haircare."
The key here is to keep it simple and intuitive for your customers—ask yourself, “How would I want to navigate if I were shopping for these products?” Breaking it down this way makes it much easier for customers to find what they need, leading to better engagement and, ultimately, more sales.
Step 2: Complete the initial store setup
Go to the left-hand side menu and select “Manage Stores.”

Click on “Create Store” and choose your brand from the list. Keep in mind, that your brand will only appear if it’s enrolled in The Brand Registry.
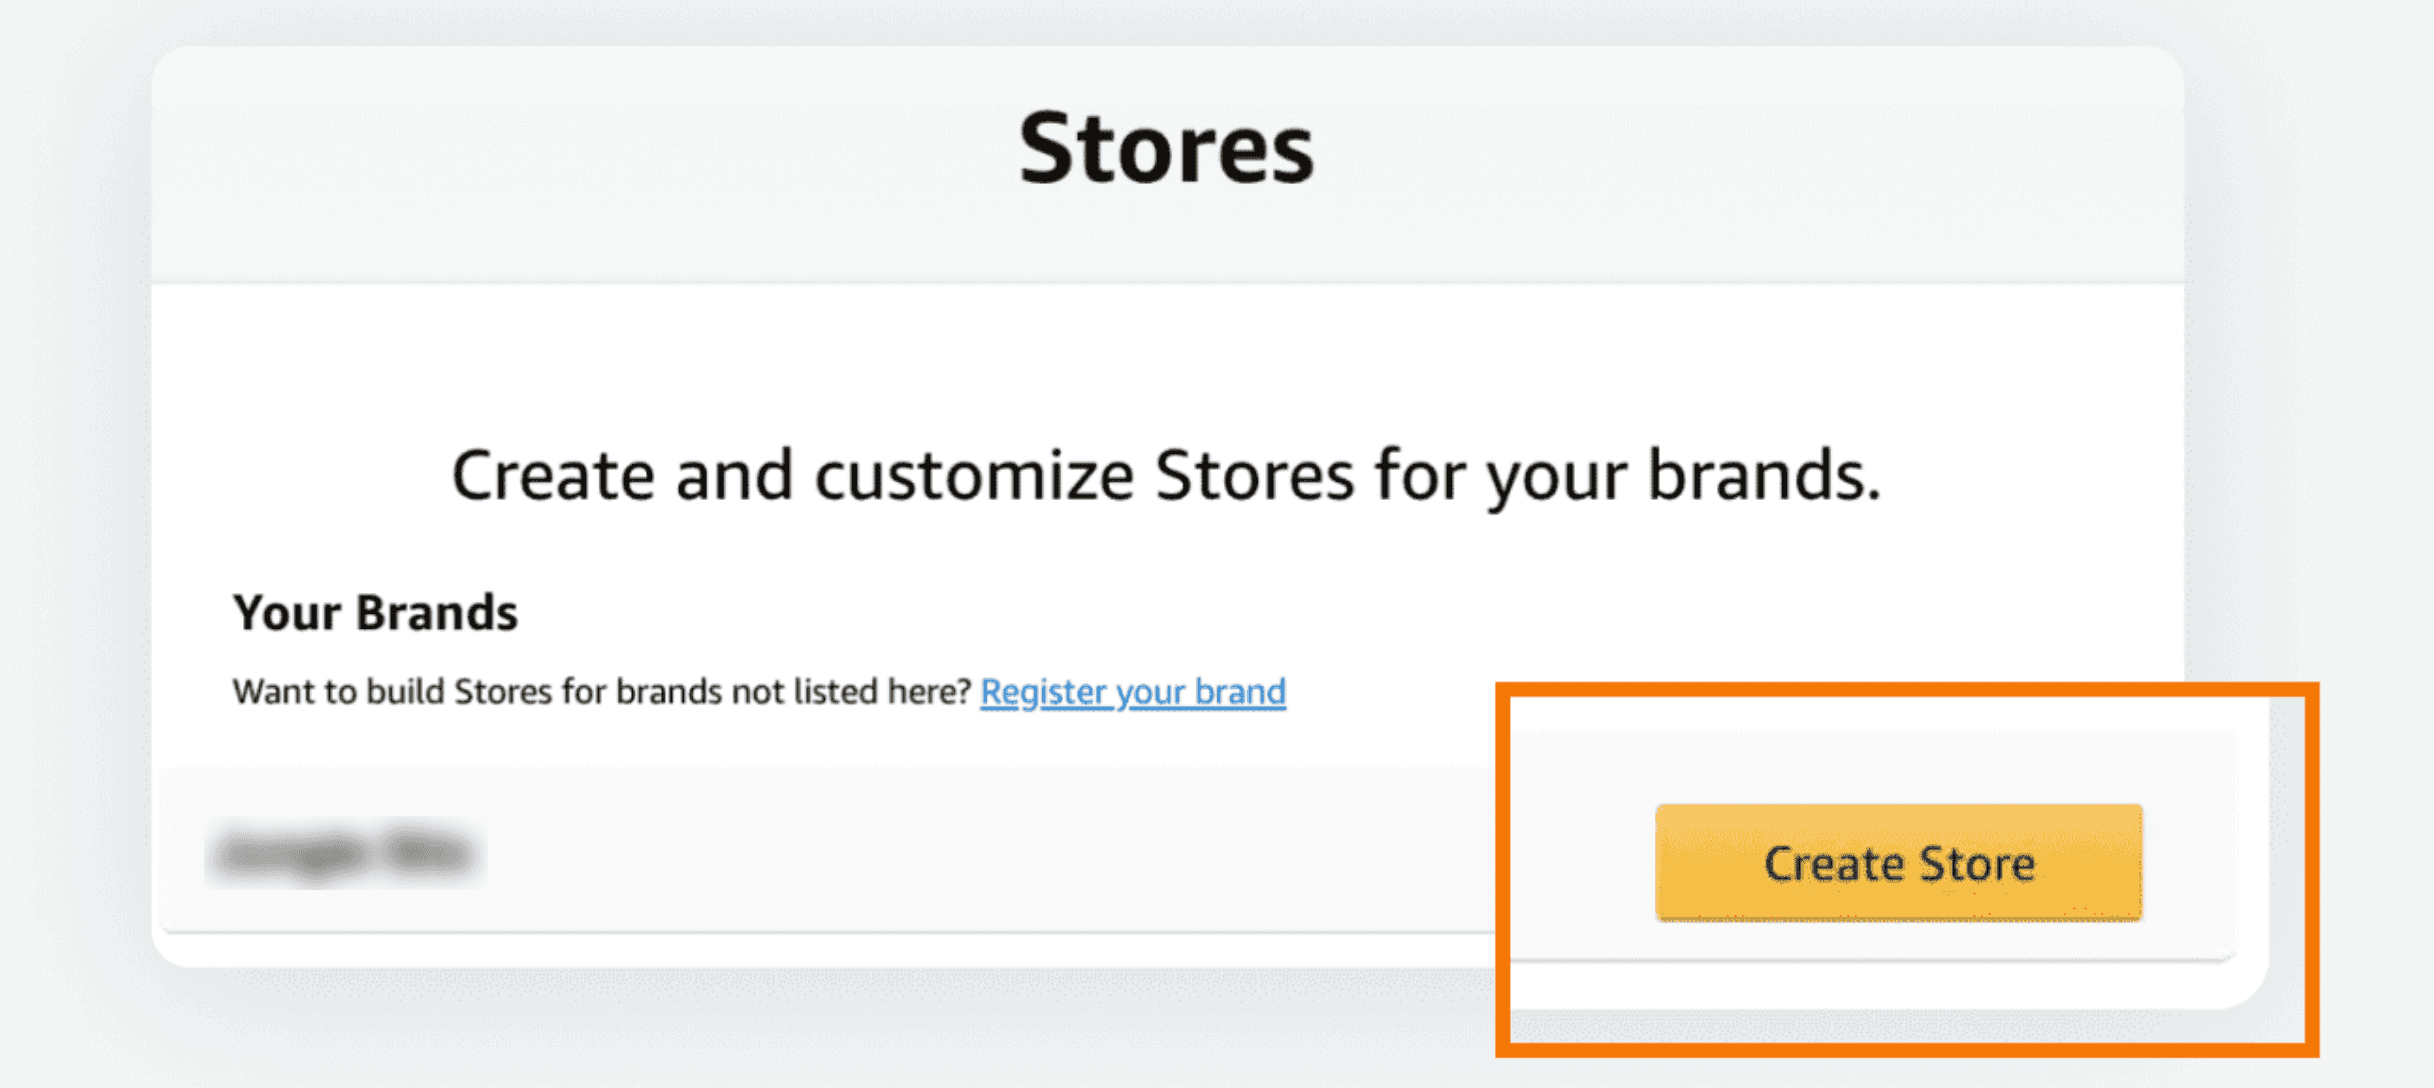
Now, you’ll be taken to the Store Builder. The first thing you need to do is enter your brand display name and upload your brand logo. Once you’ve done that, click “Next.”
Step 3: Create a store layout
Now every brand is different, but every website or brand store in this case has some common layout that can be highlighted. After working on 500+ storefronts we have found a layout that’s simple to follow as well as winning.
1) Make a great first impression with a header image
You walk into a room, and the first thing you see sets the tone, right? The same goes for your Amazon storefront. Keep it simple, nothing too flashy—just enough to catch their eye. A sleek logo or a lifestyle image that fits the vibe of your brand. Make sure it’s worth a look because, let's be honest, it's the first thing they’ll see when they arrive.


2) Give them a reason to stay
Now that they're hooked, it’s time to tell them a little about yourself. One banner or a video (optional). That’s all. Let your story do the talking. No need to shove products down their throat just yet. You’re not desperate—this is just a smooth introduction. You give them a taste of what your brand is about, then let them explore your catalog.
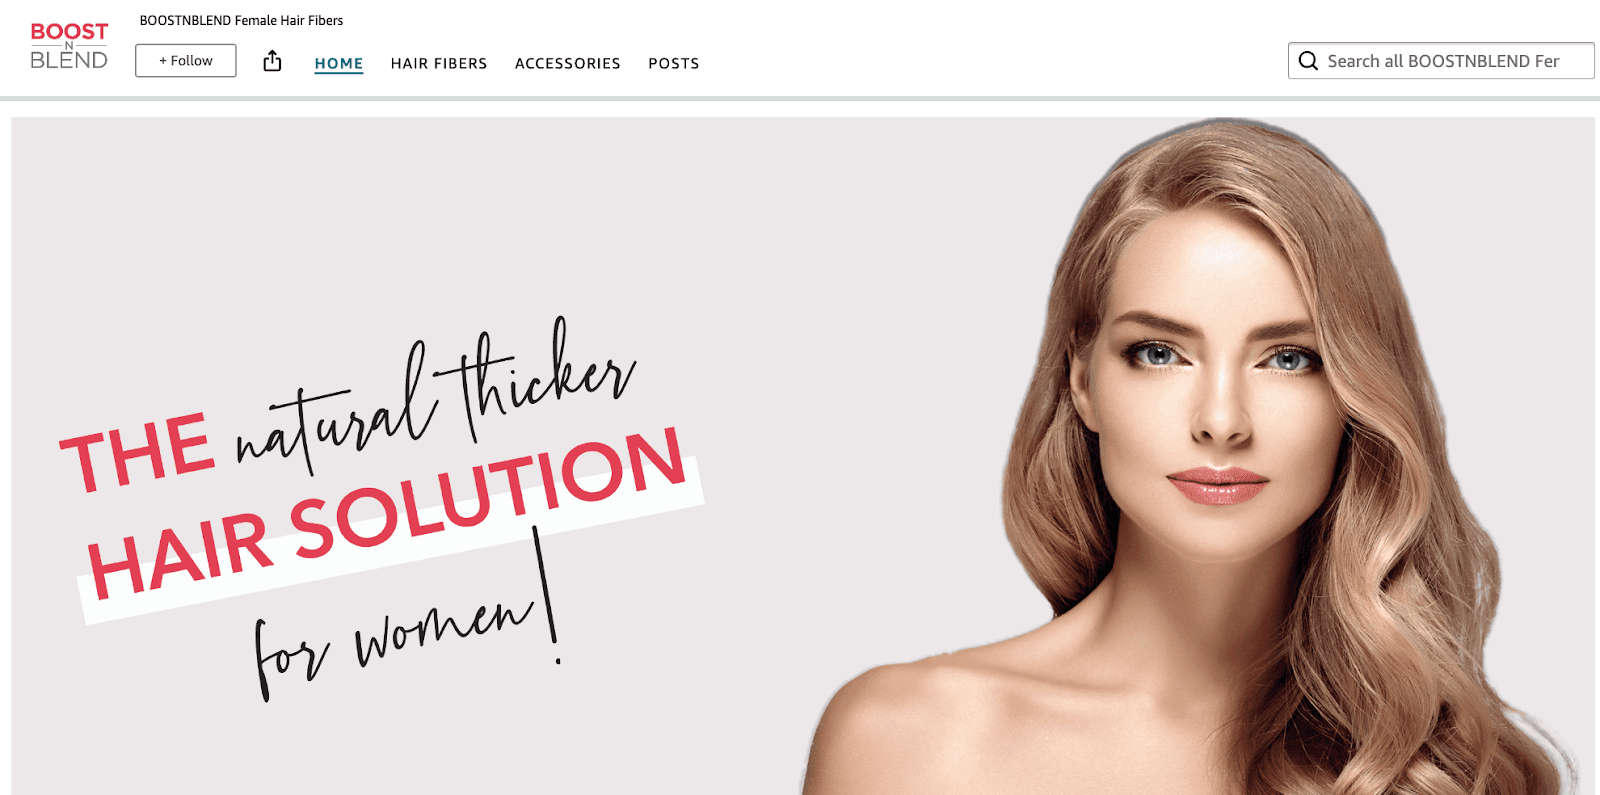
3) Show them what you sell
Remember that product category list we created? Time to put it to work. Link those categories with clean, engaging images. One click and they’re exactly where they need to be. No guessing, no confusion—just a seamless experience.
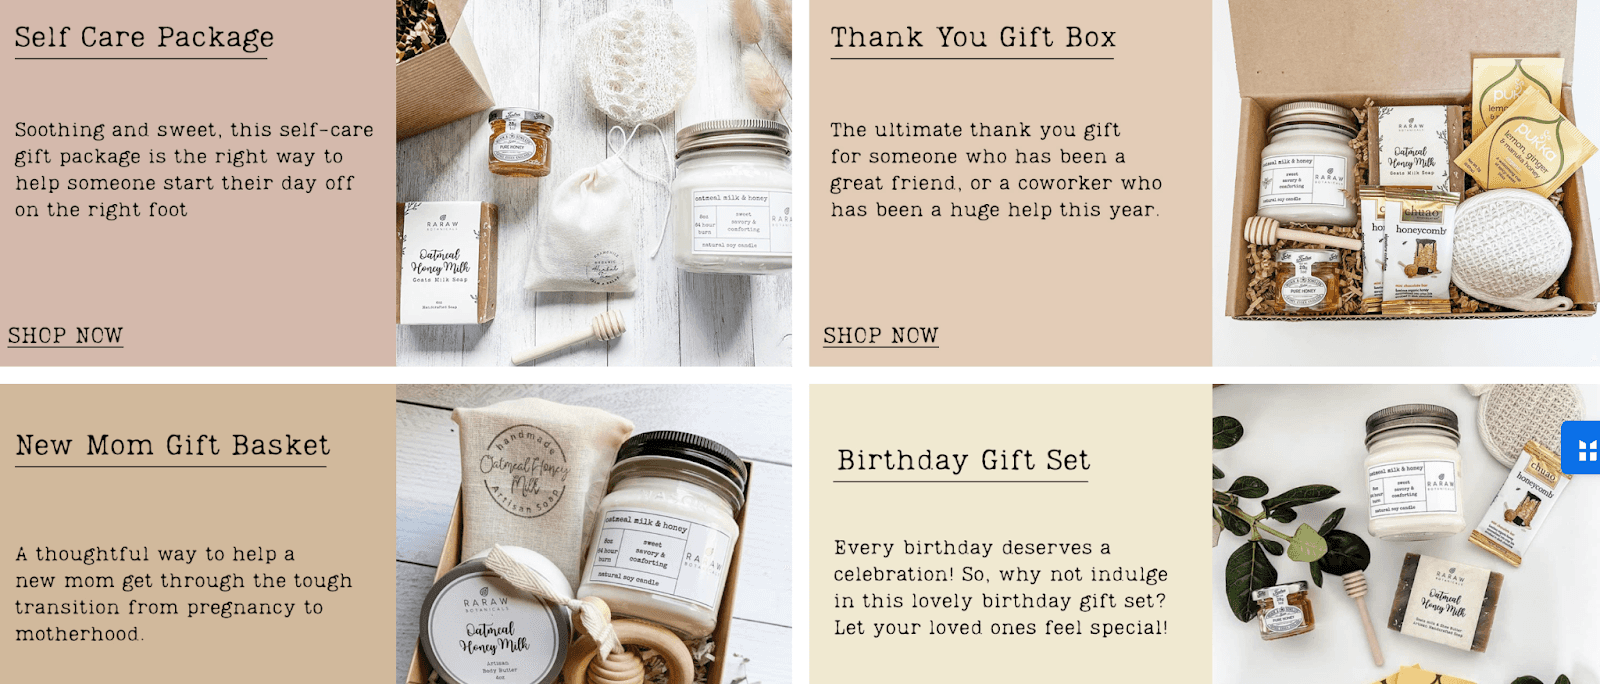
4) Add the “Bestsellers” and “Recommended for you” tiles
You can place these anywhere on your page, but let’s be honest—your Best Sellers deserve prime real estate, so put them near the top. It just makes sense. These tiles are automatically filled by Amazon, so while you don’t get to handpick the ASINs, they’re based on your sales history and customer behavior. Trust Amazon to get it right—they’ve got the data.

5) Add more banners (show more, tell less)
Want to talk about your product’s certifications? Or maybe tell the story of how your brand came to be? Throw in some details about the charity work you’ve been doing.
Whatever you decide to add, make sure you do less talking, and more showing. You don’t want to bore people with a novel—just give them enough to feel impressed.


6) Add a product grid
Now, we wrap it up with a “Product Grid”. Every page should end with a grid. You don’t want to leave them hanging without a way to grab your products. On your home page? Yeah, that’s got to have a grid too. Add all your ASINs—500 max per grid. Got more than that? Pick your top 500 best sellers and add to the grid.
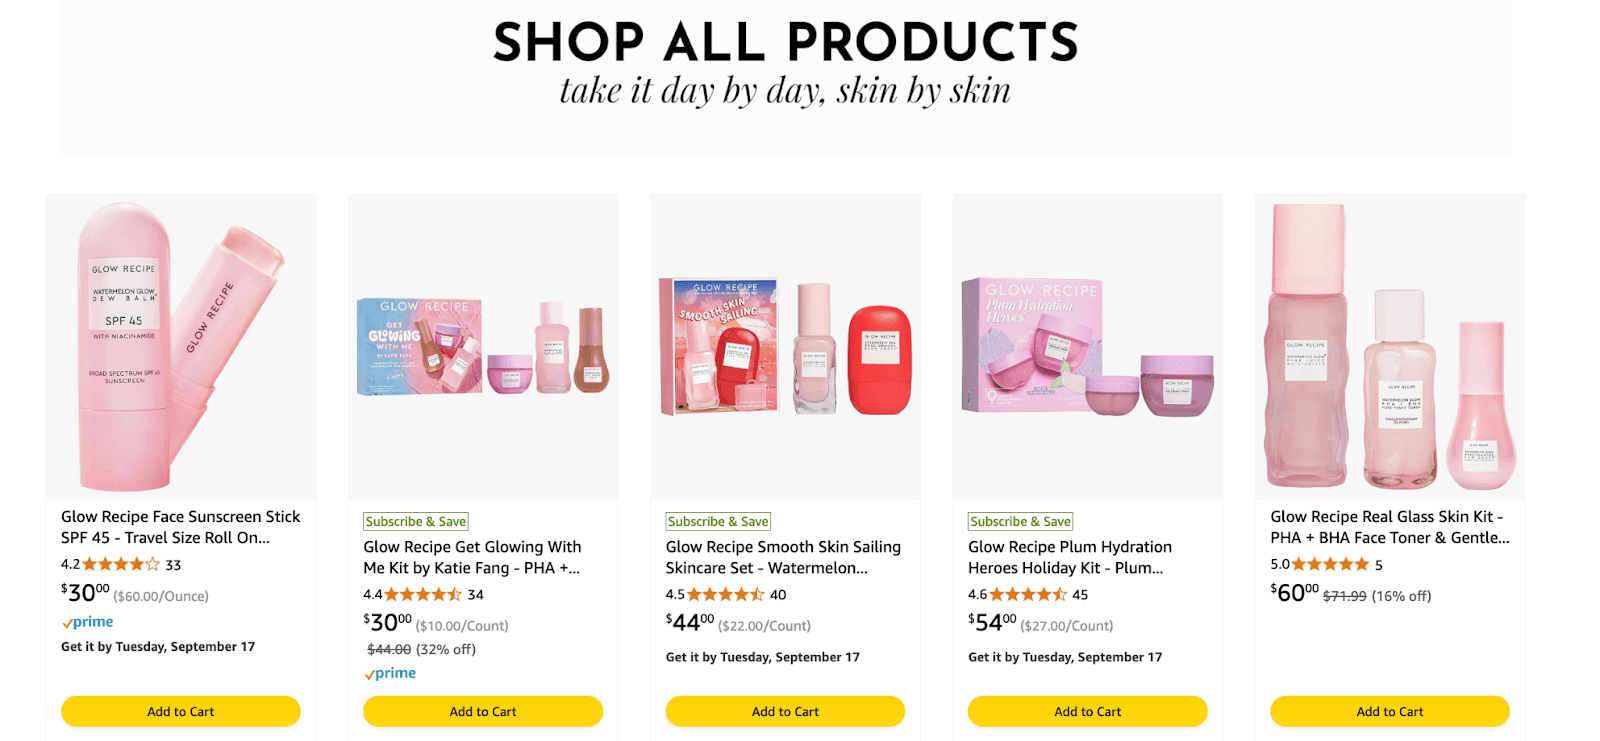
Layout example

For inner pages
Step 4: Start adding your assets to your Amazon brand page design
Now it's time to bring your Amazon Store to life by adding your assets. These include everything from images and videos to product listings and text modules. The goal here is to create a visually appealing and easy-to-navigate experience for your customers.
Step 5: Submit and optimize
Once you’ve finished building your Amazon Storefront, the final step is to click “Submit for Publishing.” After submission, Amazon will review your store within about 24 hours. Once approved, your store will go live, making it visible to customers on Amazon.
It’s important to double-check everything before submitting—make sure the design, products, and messaging are spot on because this is your brand’s digital storefront!
Amazon storefront FAQs
Q1: What are the eligibility criteria for creating an Amazon Storefront?
To create an Amazon Storefront, your brand must:
Be enrolled in Amazon Brand Registry to verify your brand’s ownership.
Have a Professional Seller Account or be registered as a vendor with Amazon. This ensures you can manage and operate the storefront.
Q2: How to Add a New Page / Sub-Pages to an Amazon Storefront
By default, you’ll have a “Home Page.” To add more pages or sub-pages:
On the left-hand side menu in the Store Builder, click on “Add Page.” Enter the title and description for the page or sub-category.
Select a template that fits your product layout or needs. Adding sub-categories can improve navigation, making it easier for customers to find specific product categories.
The pages and subpages can be easily organized using the drag-and-drop feature.
Q3: How to measure the performance of an Amazon Storefront
Amazon offers a Store Insights Dashboard that provides valuable metrics like:
Traffic sources: Understand where your visitors are coming from.
Page views and product sales: Analyze which pages perform best.
Customer engagement: See how long visitors are spending on your Store and which content resonates the most. These metrics help you optimize your Storefront, identify areas to improve, and enhance conversion rates(
Q4: Types of tiles in Amazon Storefront
Amazon Storefronts offer a variety of tiles to help showcase products, including:
Product grids: Display a collection of products in one section.
Shoppable images: Clickable images that link directly to product detail pages.
Bestsellers and Recommended Products: Auto-populated tiles based on customer behavior and sales history.
Text and image banners: Used for storytelling, highlighting brand values, or sharing product benefits.
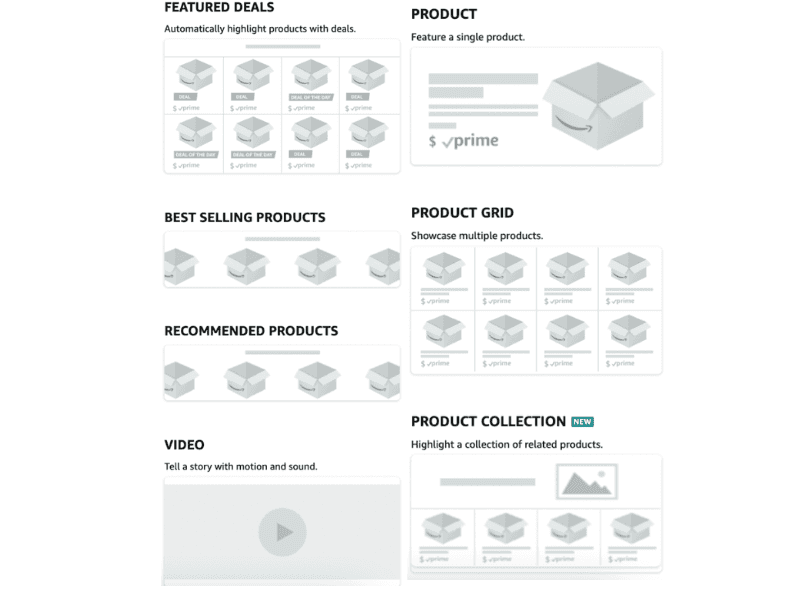
Q5: Common rejection reasons for Amazon Storefront
Amazon Storefronts can be rejected for reasons like:
Pressure or urgency in language: Phrases like "Last chance" or "Don’t miss out" are not allowed.
Inappropriate CTAs: Only neutral calls-to-action like “Shop now” or “Learn more” are allowed.
Improper contact details: Including phone numbers or social media links is prohibited if linked with a CTA like “Shop at.”
Non-clickable elements: Avoid using non-functional tiles that confuse customers.
False functionality: Do not mislead customers with interactive elements that don’t work(
Q6: Does Amazon Storefront impact SEO?
Amazon Storefronts themselves do not directly influence Amazon SEO, but they do appear on Google search results. The meta description you add to your Store or sub-pages will show up on Google, so writing optimized descriptions helps drive external traffic to your Store.
Top Amazon storefront designs created by eStore Factory
#1: Rudie Nudie

#2: Levelize
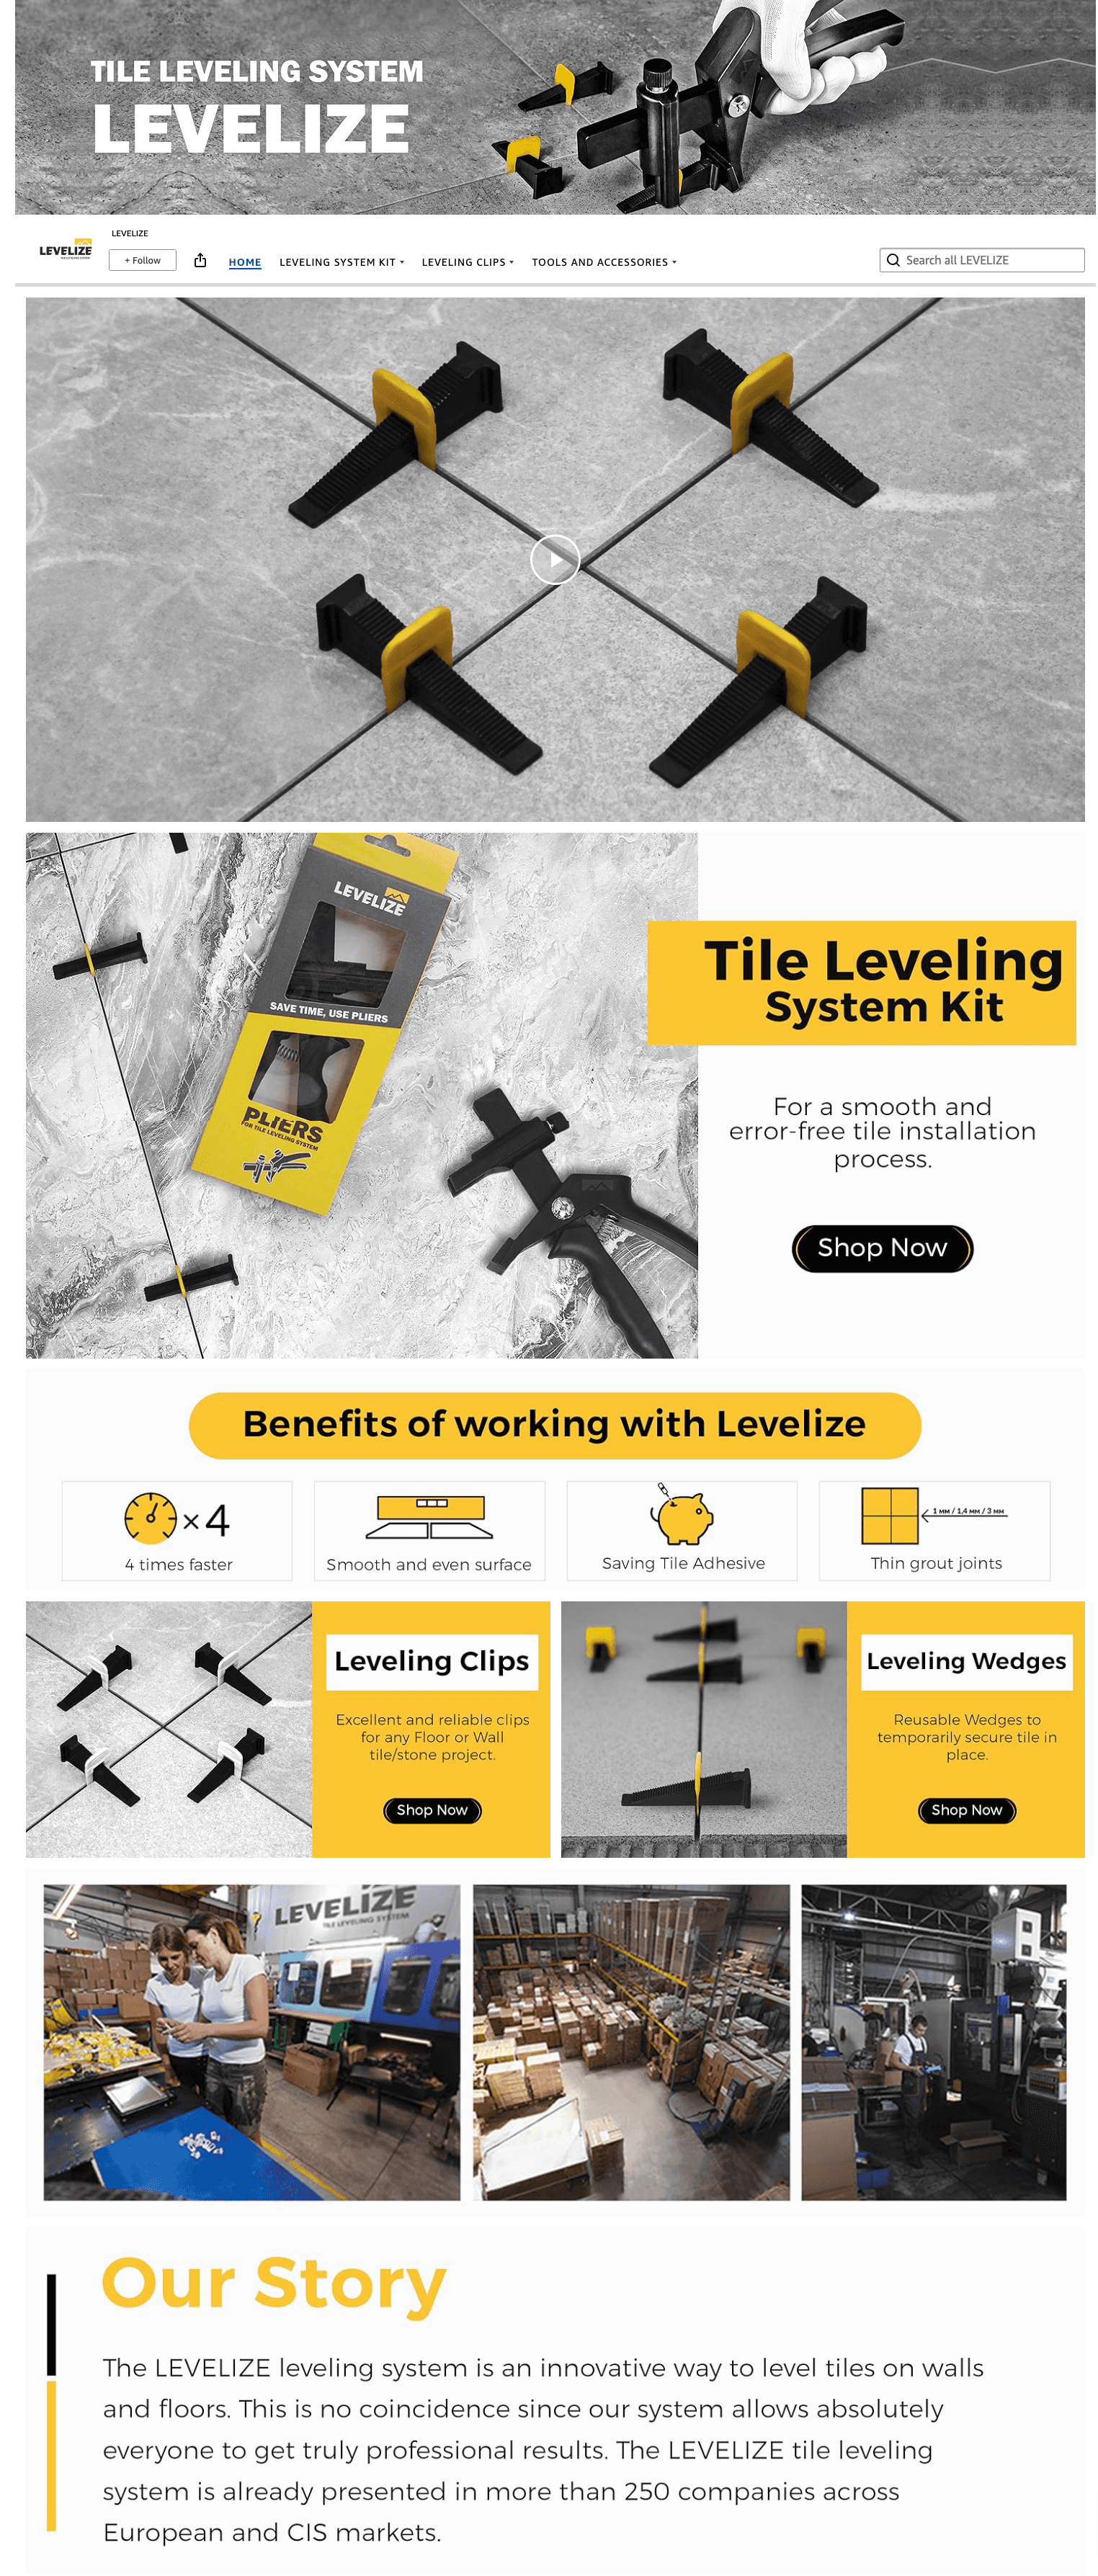
#3: Rolly Hanger

#4: USA Nutra

#5: Howitzer

#6: A1HC

#7: Zeho

#8: MV Ellis

#9: atteret
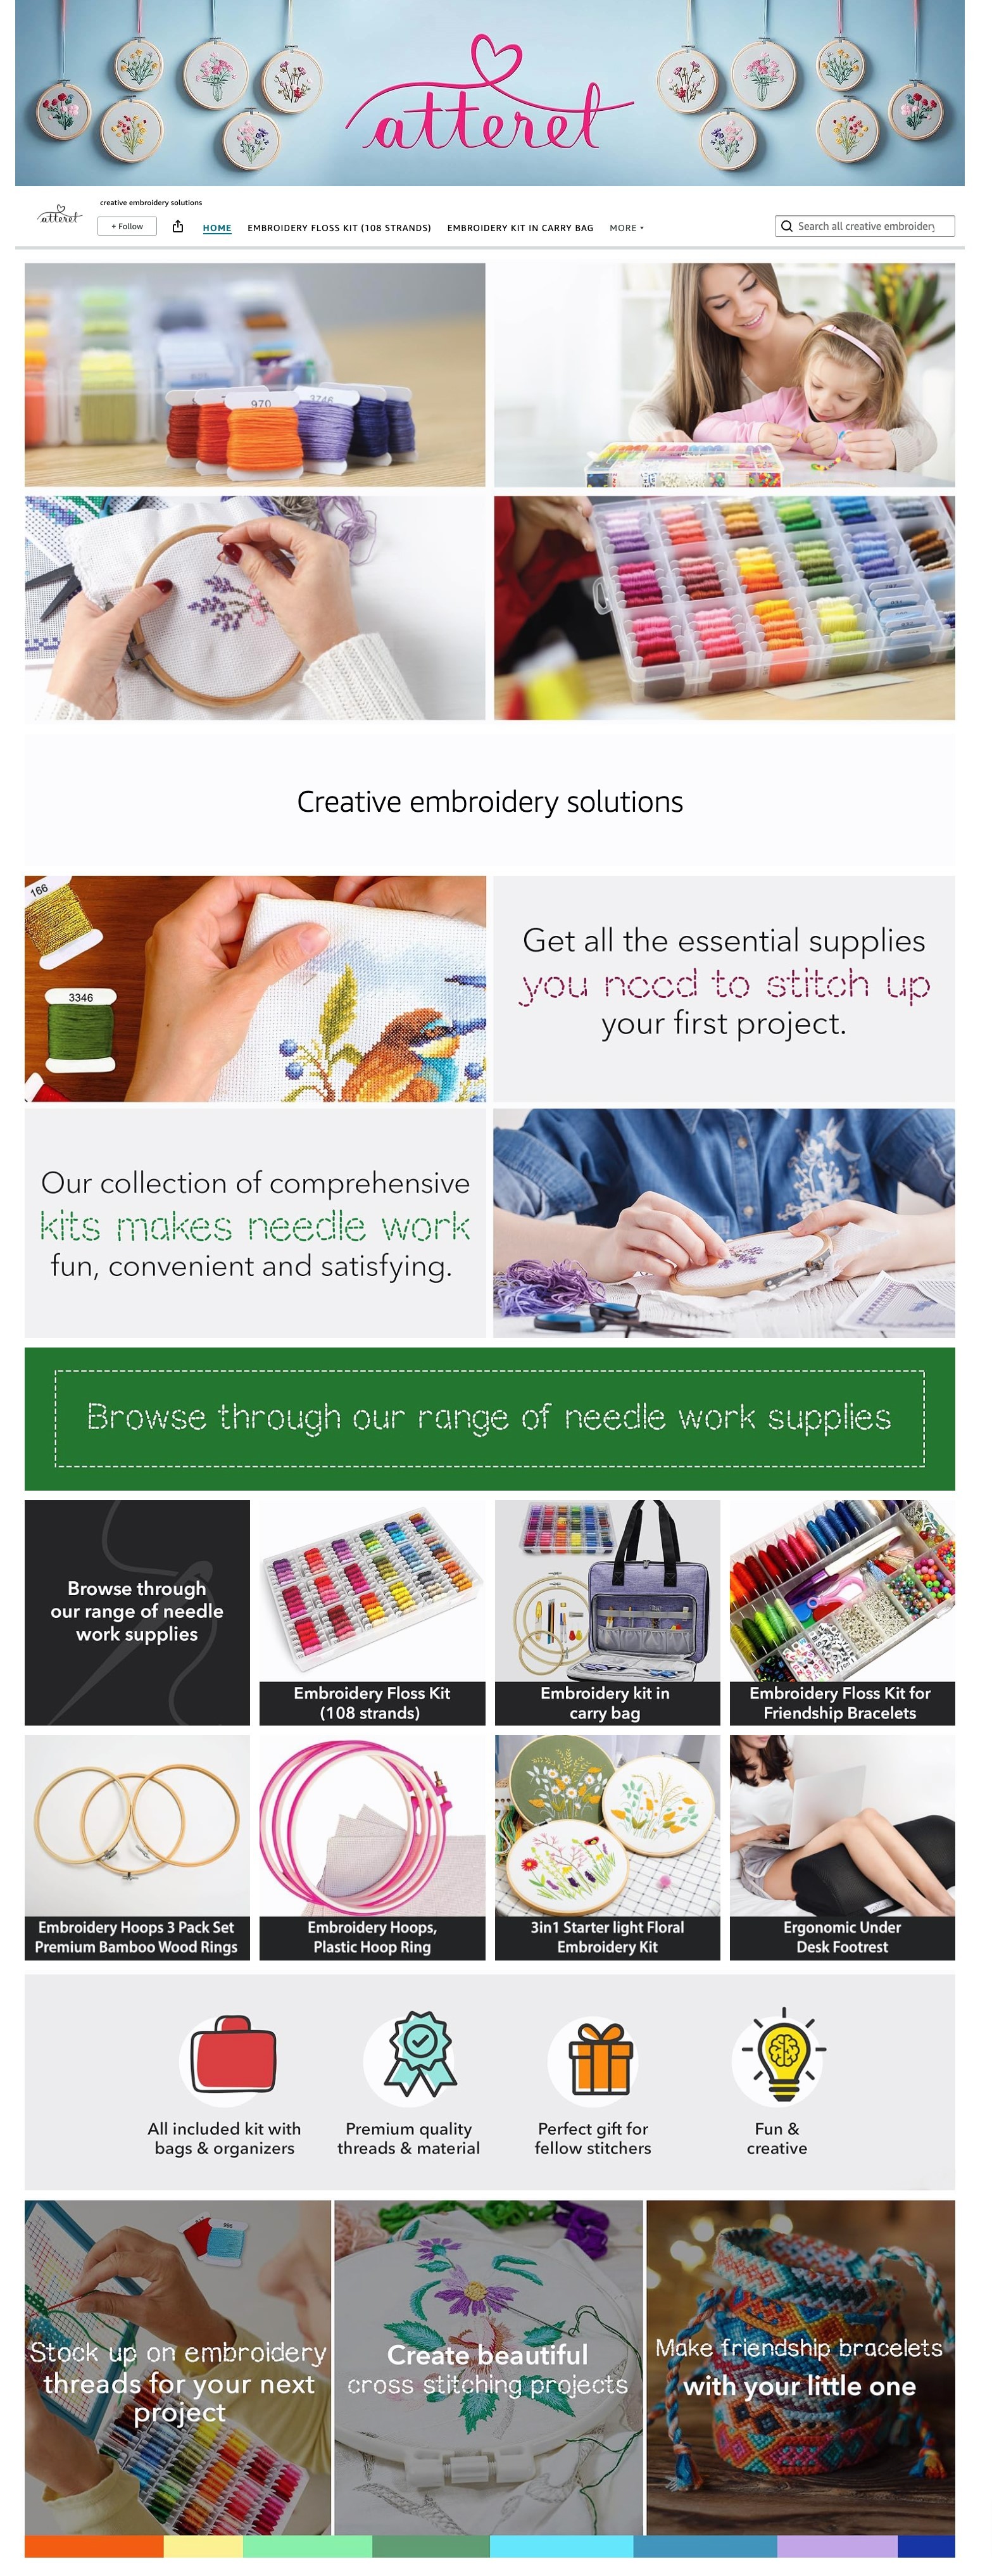
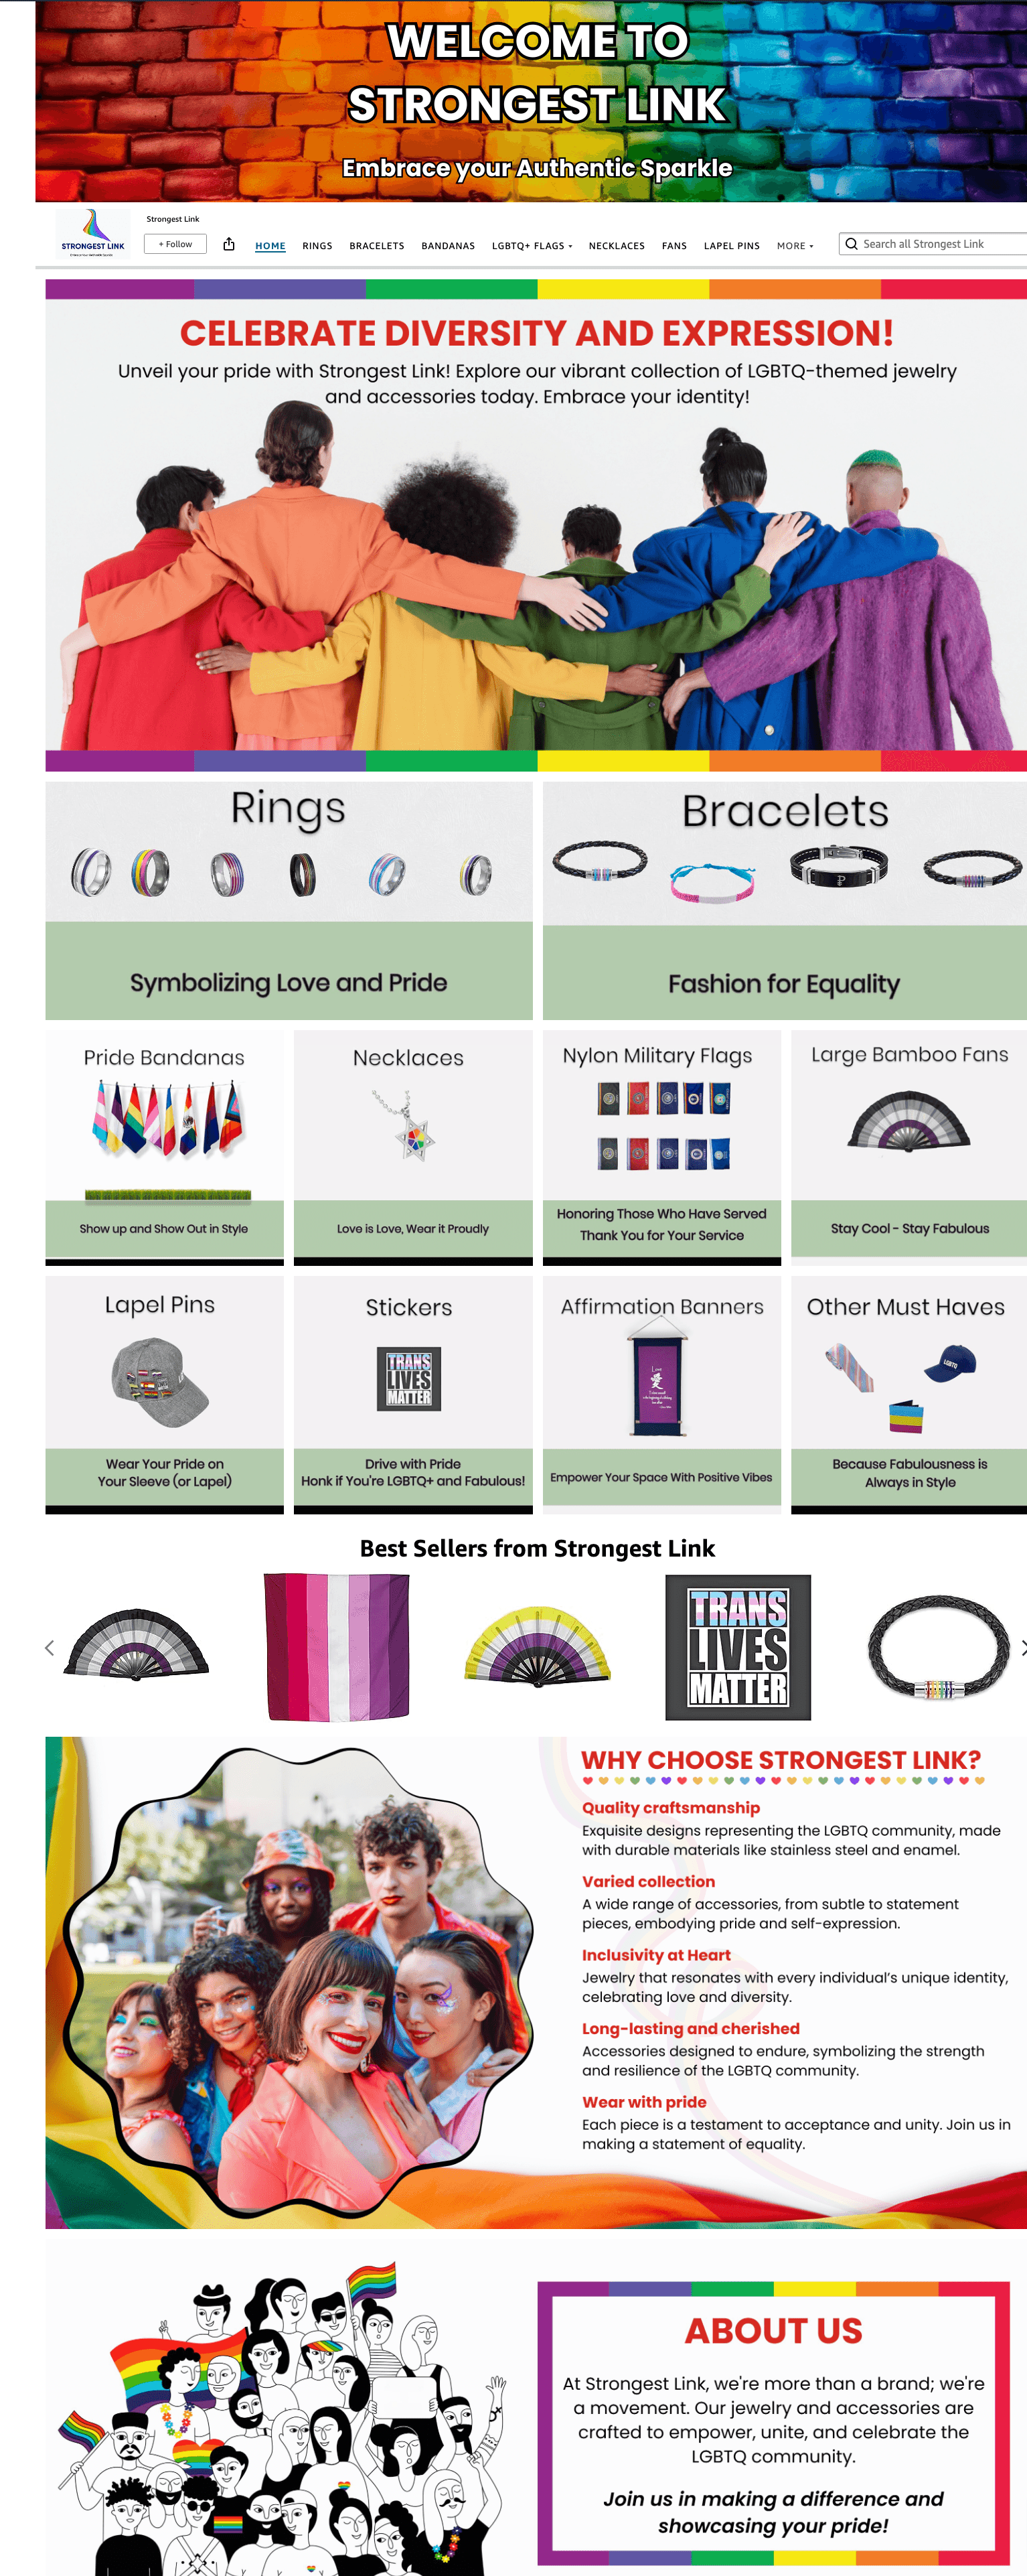
#10: Strongest Link
See you next week!
Is the Amazon brand store creation something you should DIY? Sure—if you’ve got a clear vision and some solid design skills, go for it. But if you’re even a little unsure or hesitant, why risk it? Let the pros at eStore Factory handle it.
We’ll take care of everything, from organizing your ASINs and crafting a user-friendly layout to designing eye-catching banners and ensuring your store goes live smoothly on Amazon. Hire our Amazon seller consulting services, sit back, and let us do what we do best!
TL;DR
Anyone can set up an Amazon Storefront with ready-made templates, but making one stand out requires more than just dragging and dropping.
Organize your products into categories and subcategories to help customers easily find what they need.
Follow a solid layout: Start with a great header image, share your brand’s story, and then guide customers through clean, linked categories.
Use bestseller and recommended tiles, which are auto-populated by Amazon.
Always finish with a product grid of 500 ASINs per page to make sure customers have access to your top products.
Once built, submit your storefront for review. Amazon will approve it within 24 hours, making it live for your customers.
Anyone can throw together an Amazon Storefront. Amazon gives you some ready-made templates, and all you have to do is plug in your lifestyle shots, infographics, and product listings. Boom—your storefront is live.
But if you want a storefront that’s rated high by Amazon (yep, Amazon grades them), you’ve got to know a little more than just dragging and dropping. There’s a method to the madness, and in this blog post, we’re diving deep into what makes an Amazon brand store design stand out. Keep reading!
Quick guide
Step 1: Divide products into categories and subcategories
Step 2: Complete the initial store setup
Step 3: Create a store layout
Make a great first impression with a header image
Give them a reason to stay
Show them what you sell
Add the “Bestsellers” and “Recommended for you” tiles
Add more banners (show more, tell less)
Add a product grid
Step 4: Start adding your assets to your Amazon brand page design
Step 5: Submit and optimize
Amazon storefront FAQs
Q1: What are the eligibility criteria for creating an Amazon Storefront?
Q2: How to Add a New Page / Sub-Pages to an Amazon Storefront
Q3: How to measure the performance of an Amazon Storefront
Q4: Types of tiles in Amazon Storefront
Q5: Common rejection reasons for Amazon Storefront
Q6: Does Amazon Storefront impact SEO?
Top Amazon storefront designs created by eStore Factory
Step 1: Divide products into categories and subcategories
There are two scenarios to consider. Scenario 1: you have dozens or even hundreds of products. Scenario 2: you have only 10, 5, or even fewer products. If you have more products, creating categories and subcategories becomes essential for organizing and simplifying navigation for your customers.
This is especially helpful when shoppers are trying to find specific products. For example, if you’re selling outdoor gear, you might have a main category for "Camping Equipment" and subcategories for "Tents," "Sleeping Bags," and "Backpacks." This structure helps guide customers quickly to what they’re looking for.

To get started with setting up your categories and subcategories, the first step is to create a list of ASINs. Once you have that list, go through the ASINs and group them into practical categories that make sense for your product range. For example, if you’re selling beauty products, you could divide them into "Skincare," "Makeup," and "Haircare."
The key here is to keep it simple and intuitive for your customers—ask yourself, “How would I want to navigate if I were shopping for these products?” Breaking it down this way makes it much easier for customers to find what they need, leading to better engagement and, ultimately, more sales.
Step 2: Complete the initial store setup
Go to the left-hand side menu and select “Manage Stores.”

Click on “Create Store” and choose your brand from the list. Keep in mind, that your brand will only appear if it’s enrolled in The Brand Registry.

Now, you’ll be taken to the Store Builder. The first thing you need to do is enter your brand display name and upload your brand logo. Once you’ve done that, click “Next.”
Step 3: Create a store layout
Now every brand is different, but every website or brand store in this case has some common layout that can be highlighted. After working on 500+ storefronts we have found a layout that’s simple to follow as well as winning.
1) Make a great first impression with a header image
You walk into a room, and the first thing you see sets the tone, right? The same goes for your Amazon storefront. Keep it simple, nothing too flashy—just enough to catch their eye. A sleek logo or a lifestyle image that fits the vibe of your brand. Make sure it’s worth a look because, let's be honest, it's the first thing they’ll see when they arrive.


2) Give them a reason to stay
Now that they're hooked, it’s time to tell them a little about yourself. One banner or a video (optional). That’s all. Let your story do the talking. No need to shove products down their throat just yet. You’re not desperate—this is just a smooth introduction. You give them a taste of what your brand is about, then let them explore your catalog.

3) Show them what you sell
Remember that product category list we created? Time to put it to work. Link those categories with clean, engaging images. One click and they’re exactly where they need to be. No guessing, no confusion—just a seamless experience.

4) Add the “Bestsellers” and “Recommended for you” tiles
You can place these anywhere on your page, but let’s be honest—your Best Sellers deserve prime real estate, so put them near the top. It just makes sense. These tiles are automatically filled by Amazon, so while you don’t get to handpick the ASINs, they’re based on your sales history and customer behavior. Trust Amazon to get it right—they’ve got the data.

5) Add more banners (show more, tell less)
Want to talk about your product’s certifications? Or maybe tell the story of how your brand came to be? Throw in some details about the charity work you’ve been doing.
Whatever you decide to add, make sure you do less talking, and more showing. You don’t want to bore people with a novel—just give them enough to feel impressed.


6) Add a product grid
Now, we wrap it up with a “Product Grid”. Every page should end with a grid. You don’t want to leave them hanging without a way to grab your products. On your home page? Yeah, that’s got to have a grid too. Add all your ASINs—500 max per grid. Got more than that? Pick your top 500 best sellers and add to the grid.

Layout example

For inner pages
Step 4: Start adding your assets to your Amazon brand page design
Now it's time to bring your Amazon Store to life by adding your assets. These include everything from images and videos to product listings and text modules. The goal here is to create a visually appealing and easy-to-navigate experience for your customers.
Step 5: Submit and optimize
Once you’ve finished building your Amazon Storefront, the final step is to click “Submit for Publishing.” After submission, Amazon will review your store within about 24 hours. Once approved, your store will go live, making it visible to customers on Amazon.
It’s important to double-check everything before submitting—make sure the design, products, and messaging are spot on because this is your brand’s digital storefront!
Amazon storefront FAQs
Q1: What are the eligibility criteria for creating an Amazon Storefront?
To create an Amazon Storefront, your brand must:
Be enrolled in Amazon Brand Registry to verify your brand’s ownership.
Have a Professional Seller Account or be registered as a vendor with Amazon. This ensures you can manage and operate the storefront.
Q2: How to Add a New Page / Sub-Pages to an Amazon Storefront
By default, you’ll have a “Home Page.” To add more pages or sub-pages:
On the left-hand side menu in the Store Builder, click on “Add Page.” Enter the title and description for the page or sub-category.
Select a template that fits your product layout or needs. Adding sub-categories can improve navigation, making it easier for customers to find specific product categories.
The pages and subpages can be easily organized using the drag-and-drop feature.
Q3: How to measure the performance of an Amazon Storefront
Amazon offers a Store Insights Dashboard that provides valuable metrics like:
Traffic sources: Understand where your visitors are coming from.
Page views and product sales: Analyze which pages perform best.
Customer engagement: See how long visitors are spending on your Store and which content resonates the most. These metrics help you optimize your Storefront, identify areas to improve, and enhance conversion rates(
Q4: Types of tiles in Amazon Storefront
Amazon Storefronts offer a variety of tiles to help showcase products, including:
Product grids: Display a collection of products in one section.
Shoppable images: Clickable images that link directly to product detail pages.
Bestsellers and Recommended Products: Auto-populated tiles based on customer behavior and sales history.
Text and image banners: Used for storytelling, highlighting brand values, or sharing product benefits.

Q5: Common rejection reasons for Amazon Storefront
Amazon Storefronts can be rejected for reasons like:
Pressure or urgency in language: Phrases like "Last chance" or "Don’t miss out" are not allowed.
Inappropriate CTAs: Only neutral calls-to-action like “Shop now” or “Learn more” are allowed.
Improper contact details: Including phone numbers or social media links is prohibited if linked with a CTA like “Shop at.”
Non-clickable elements: Avoid using non-functional tiles that confuse customers.
False functionality: Do not mislead customers with interactive elements that don’t work(
Q6: Does Amazon Storefront impact SEO?
Amazon Storefronts themselves do not directly influence Amazon SEO, but they do appear on Google search results. The meta description you add to your Store or sub-pages will show up on Google, so writing optimized descriptions helps drive external traffic to your Store.
Top Amazon storefront designs created by eStore Factory
#1: Rudie Nudie

#2: Levelize

#3: Rolly Hanger

#4: USA Nutra

#5: Howitzer

#6: A1HC

#7: Zeho

#8: MV Ellis

#9: atteret

#10: Strongest Link

See you next week!
Is the Amazon brand store creation something you should DIY? Sure—if you’ve got a clear vision and some solid design skills, go for it. But if you’re even a little unsure or hesitant, why risk it? Let the pros at eStore Factory handle it.
We’ll take care of everything, from organizing your ASINs and crafting a user-friendly layout to designing eye-catching banners and ensuring your store goes live smoothly on Amazon. Hire our Amazon seller consulting services, sit back, and let us do what we do best!
TL;DR
Anyone can set up an Amazon Storefront with ready-made templates, but making one stand out requires more than just dragging and dropping.
Organize your products into categories and subcategories to help customers easily find what they need.
Follow a solid layout: Start with a great header image, share your brand’s story, and then guide customers through clean, linked categories.
Use bestseller and recommended tiles, which are auto-populated by Amazon.
Always finish with a product grid of 500 ASINs per page to make sure customers have access to your top products.
Once built, submit your storefront for review. Amazon will approve it within 24 hours, making it live for your customers.
Anyone can throw together an Amazon Storefront. Amazon gives you some ready-made templates, and all you have to do is plug in your lifestyle shots, infographics, and product listings. Boom—your storefront is live.
But if you want a storefront that’s rated high by Amazon (yep, Amazon grades them), you’ve got to know a little more than just dragging and dropping. There’s a method to the madness, and in this blog post, we’re diving deep into what makes an Amazon brand store design stand out. Keep reading!
Quick guide
Step 1: Divide products into categories and subcategories
Step 2: Complete the initial store setup
Step 3: Create a store layout
Make a great first impression with a header image
Give them a reason to stay
Show them what you sell
Add the “Bestsellers” and “Recommended for you” tiles
Add more banners (show more, tell less)
Add a product grid
Step 4: Start adding your assets to your Amazon brand page design
Step 5: Submit and optimize
Amazon storefront FAQs
Q1: What are the eligibility criteria for creating an Amazon Storefront?
Q2: How to Add a New Page / Sub-Pages to an Amazon Storefront
Q3: How to measure the performance of an Amazon Storefront
Q4: Types of tiles in Amazon Storefront
Q5: Common rejection reasons for Amazon Storefront
Q6: Does Amazon Storefront impact SEO?
Top Amazon storefront designs created by eStore Factory
Step 1: Divide products into categories and subcategories
There are two scenarios to consider. Scenario 1: you have dozens or even hundreds of products. Scenario 2: you have only 10, 5, or even fewer products. If you have more products, creating categories and subcategories becomes essential for organizing and simplifying navigation for your customers.
This is especially helpful when shoppers are trying to find specific products. For example, if you’re selling outdoor gear, you might have a main category for "Camping Equipment" and subcategories for "Tents," "Sleeping Bags," and "Backpacks." This structure helps guide customers quickly to what they’re looking for.

To get started with setting up your categories and subcategories, the first step is to create a list of ASINs. Once you have that list, go through the ASINs and group them into practical categories that make sense for your product range. For example, if you’re selling beauty products, you could divide them into "Skincare," "Makeup," and "Haircare."
The key here is to keep it simple and intuitive for your customers—ask yourself, “How would I want to navigate if I were shopping for these products?” Breaking it down this way makes it much easier for customers to find what they need, leading to better engagement and, ultimately, more sales.
Step 2: Complete the initial store setup
Go to the left-hand side menu and select “Manage Stores.”

Click on “Create Store” and choose your brand from the list. Keep in mind, that your brand will only appear if it’s enrolled in The Brand Registry.

Now, you’ll be taken to the Store Builder. The first thing you need to do is enter your brand display name and upload your brand logo. Once you’ve done that, click “Next.”
Step 3: Create a store layout
Now every brand is different, but every website or brand store in this case has some common layout that can be highlighted. After working on 500+ storefronts we have found a layout that’s simple to follow as well as winning.
1) Make a great first impression with a header image
You walk into a room, and the first thing you see sets the tone, right? The same goes for your Amazon storefront. Keep it simple, nothing too flashy—just enough to catch their eye. A sleek logo or a lifestyle image that fits the vibe of your brand. Make sure it’s worth a look because, let's be honest, it's the first thing they’ll see when they arrive.


2) Give them a reason to stay
Now that they're hooked, it’s time to tell them a little about yourself. One banner or a video (optional). That’s all. Let your story do the talking. No need to shove products down their throat just yet. You’re not desperate—this is just a smooth introduction. You give them a taste of what your brand is about, then let them explore your catalog.

3) Show them what you sell
Remember that product category list we created? Time to put it to work. Link those categories with clean, engaging images. One click and they’re exactly where they need to be. No guessing, no confusion—just a seamless experience.

4) Add the “Bestsellers” and “Recommended for you” tiles
You can place these anywhere on your page, but let’s be honest—your Best Sellers deserve prime real estate, so put them near the top. It just makes sense. These tiles are automatically filled by Amazon, so while you don’t get to handpick the ASINs, they’re based on your sales history and customer behavior. Trust Amazon to get it right—they’ve got the data.

5) Add more banners (show more, tell less)
Want to talk about your product’s certifications? Or maybe tell the story of how your brand came to be? Throw in some details about the charity work you’ve been doing.
Whatever you decide to add, make sure you do less talking, and more showing. You don’t want to bore people with a novel—just give them enough to feel impressed.


6) Add a product grid
Now, we wrap it up with a “Product Grid”. Every page should end with a grid. You don’t want to leave them hanging without a way to grab your products. On your home page? Yeah, that’s got to have a grid too. Add all your ASINs—500 max per grid. Got more than that? Pick your top 500 best sellers and add to the grid.

Layout example

For inner pages
Step 4: Start adding your assets to your Amazon brand page design
Now it's time to bring your Amazon Store to life by adding your assets. These include everything from images and videos to product listings and text modules. The goal here is to create a visually appealing and easy-to-navigate experience for your customers.
Step 5: Submit and optimize
Once you’ve finished building your Amazon Storefront, the final step is to click “Submit for Publishing.” After submission, Amazon will review your store within about 24 hours. Once approved, your store will go live, making it visible to customers on Amazon.
It’s important to double-check everything before submitting—make sure the design, products, and messaging are spot on because this is your brand’s digital storefront!
Amazon storefront FAQs
Q1: What are the eligibility criteria for creating an Amazon Storefront?
To create an Amazon Storefront, your brand must:
Be enrolled in Amazon Brand Registry to verify your brand’s ownership.
Have a Professional Seller Account or be registered as a vendor with Amazon. This ensures you can manage and operate the storefront.
Q2: How to Add a New Page / Sub-Pages to an Amazon Storefront
By default, you’ll have a “Home Page.” To add more pages or sub-pages:
On the left-hand side menu in the Store Builder, click on “Add Page.” Enter the title and description for the page or sub-category.
Select a template that fits your product layout or needs. Adding sub-categories can improve navigation, making it easier for customers to find specific product categories.
The pages and subpages can be easily organized using the drag-and-drop feature.
Q3: How to measure the performance of an Amazon Storefront
Amazon offers a Store Insights Dashboard that provides valuable metrics like:
Traffic sources: Understand where your visitors are coming from.
Page views and product sales: Analyze which pages perform best.
Customer engagement: See how long visitors are spending on your Store and which content resonates the most. These metrics help you optimize your Storefront, identify areas to improve, and enhance conversion rates(
Q4: Types of tiles in Amazon Storefront
Amazon Storefronts offer a variety of tiles to help showcase products, including:
Product grids: Display a collection of products in one section.
Shoppable images: Clickable images that link directly to product detail pages.
Bestsellers and Recommended Products: Auto-populated tiles based on customer behavior and sales history.
Text and image banners: Used for storytelling, highlighting brand values, or sharing product benefits.

Q5: Common rejection reasons for Amazon Storefront
Amazon Storefronts can be rejected for reasons like:
Pressure or urgency in language: Phrases like "Last chance" or "Don’t miss out" are not allowed.
Inappropriate CTAs: Only neutral calls-to-action like “Shop now” or “Learn more” are allowed.
Improper contact details: Including phone numbers or social media links is prohibited if linked with a CTA like “Shop at.”
Non-clickable elements: Avoid using non-functional tiles that confuse customers.
False functionality: Do not mislead customers with interactive elements that don’t work(
Q6: Does Amazon Storefront impact SEO?
Amazon Storefronts themselves do not directly influence Amazon SEO, but they do appear on Google search results. The meta description you add to your Store or sub-pages will show up on Google, so writing optimized descriptions helps drive external traffic to your Store.
Top Amazon storefront designs created by eStore Factory
#1: Rudie Nudie

#2: Levelize

#3: Rolly Hanger

#4: USA Nutra

#5: Howitzer

#6: A1HC

#7: Zeho

#8: MV Ellis

#9: atteret

#10: Strongest Link

See you next week!
Is the Amazon brand store creation something you should DIY? Sure—if you’ve got a clear vision and some solid design skills, go for it. But if you’re even a little unsure or hesitant, why risk it? Let the pros at eStore Factory handle it.
We’ll take care of everything, from organizing your ASINs and crafting a user-friendly layout to designing eye-catching banners and ensuring your store goes live smoothly on Amazon. Hire our Amazon seller consulting services, sit back, and let us do what we do best!


